My friend Leozinho called me to play capture the flag. I innocently accepted without knowing it was actually a CTF (Capture the Flag), an information security challenge where you have to hack a system to get a secret key.
The challenge he picked for me was Couch on the TryHackMe platform. Looking at the page, we can see the difficulty is easy and the final goal is to get privileges on the machine to access the file with the secret key. Along the way, we need to find other information that will be requested and guide us to the flag.
For those who don’t know, CTF challenges are basically ethical hacking puzzles. They’re designed to teach cybersecurity concepts in a safe, legal environment. Think of them as escape rooms but for hackers. You get a target system and have to find vulnerabilities to break in and capture flags (secret strings that prove you completed the challenge).
Setting up the environment
To start the challenge, I fired up a virtual machine with ParrotOS, a Linux distribution that comes packed with useful cybersecurity tools. It’s similar to Kali Linux (but with Apple Silicon support) and perfect for participating in challenges like this without messing up your main machine.
ParrotOS is basically a specialized operating system built for penetration testing and digital forensics. It includes tools for network scanning, vulnerability assessment, password cracking, and tons of other security testing utilities. Using a dedicated security distro means you don’t have to install all these tools manually.
With Linux booted up, I connected to the VPN that TryHackMe provided and noted down the IP address. The VPN connection is necessary because the target machines are on TryHackMe’s private network, so you need to connect through their VPN to reach them.
How many ports are open?
This was the first question. How do I figure out how many ports are open? I didn’t know either, so I googled how to list open ports on a specific IP and came across this command using nmap:
nmap 10.10.204.9For context, nmap (Network Mapper) is a network discovery and security auditing tool. It’s basically the Swiss Army knife of network reconnaissance. When you run it against a target, it sends packets to different ports to see which ones respond, telling you what services are running.
The command showed that there was only one open port, 22. This port is the standard for SSH (Secure Shell), which could be useful later if we need to access the machine directly. SSH is a protocol that lets you securely connect to and control remote computers over a network.
I tried answering “1” and the answer was… wrong!
I thought about it for a bit and realized that if we’re going to hack a database, I’d expect the database port to be open too. So I searched for how to list all open ports using nmap and discovered that by default, nmap only scans the 1000 most common ports. I needed to use the -p- flag to scan all 65532 ports on the computer:
nmap -p- 10.10.204.9The reason there are 65532 ports is that port numbers are 16-bit integers, giving us 65536 possible values (0-65535). Ports 0-1023 are reserved for system services, and some other ports have special meanings, leaving us with 65532 usable ports.
After 16 long minutes, it found just one more port, 5984. The correct answer was “2”.
Accessing CouchDB
Using the command curl 10.10.204.9:5984 (or accessing this URL in the browser), we can see some data about the application running on this port, confirming that it’s indeed CouchDB version 1.6.1:
{
	"couchdb": "Welcome",
	"uuid": "ef680bb740692240059420b2c17db8f3",
	"version": "1.6.1",
	"vendor": {
		"version": "16.04",
		"name": "Ubuntu"
	}
}
CouchDB is a NoSQL database that stores data as JSON documents. Unlike traditional SQL databases with tables and rows, CouchDB organizes data into documents that can have different structures. It’s designed to be distributed and fault-tolerant, and it has a RESTful HTTP API, which means you can interact with it using standard web requests.
The challenge also asks for the routes to the database’s admin panel and to list all databases. A quick Google search gives us _utils and _all_dbs, respectively. We can access these routes in the browser to confirm the answer and get full access to the database:
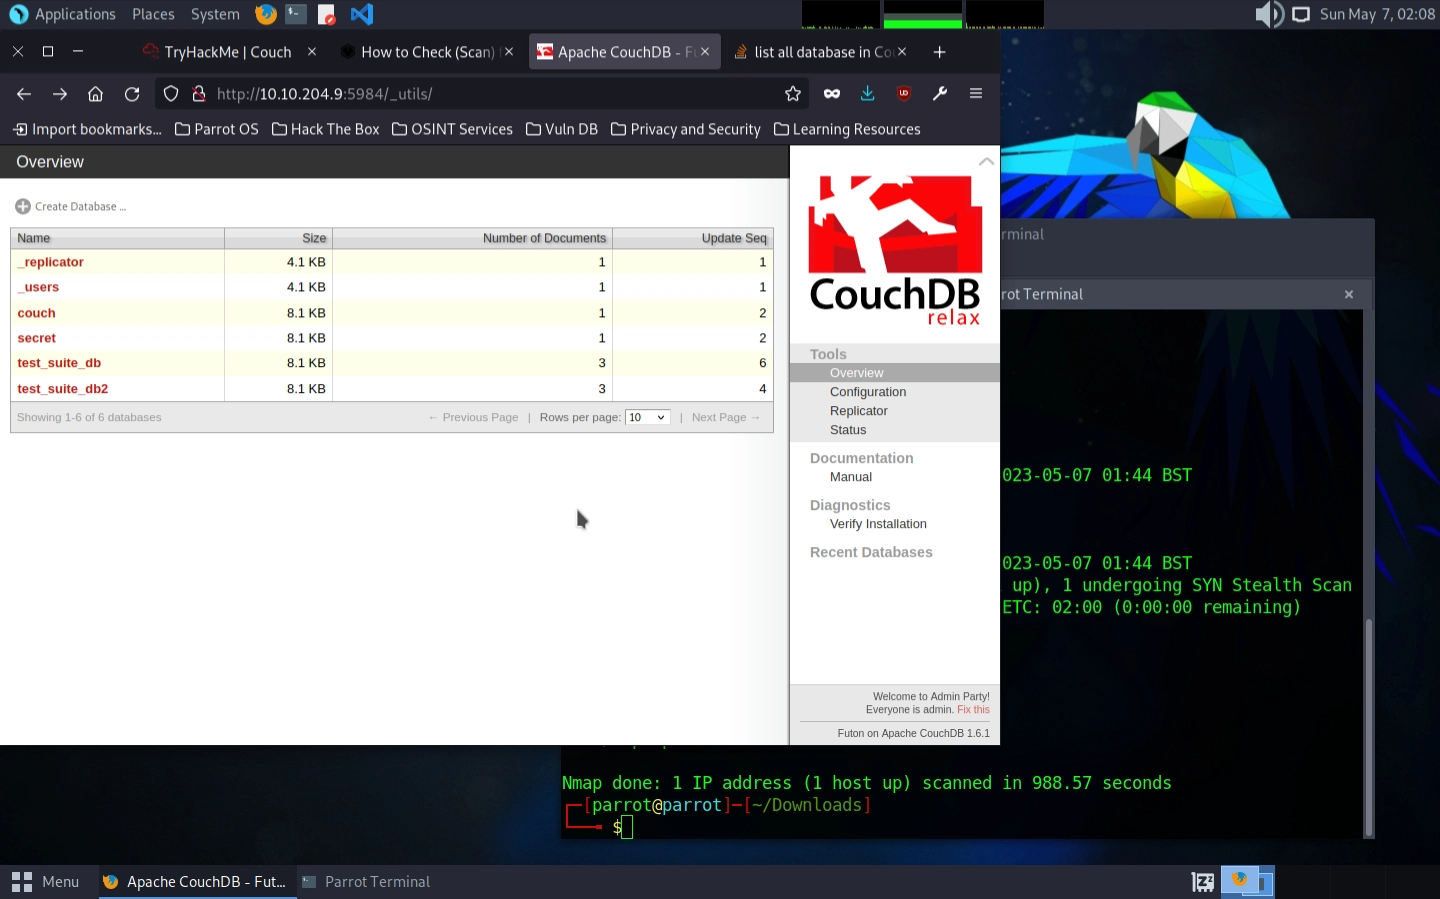
No password or anything? This is too good to be true… 🤨
This is a classic example of a misconfigured service. CouchDB, like many databases, should have authentication enabled in production environments. The fact that we can access the admin interface without any credentials is a major security vulnerability.
Anyway… the “secret” database catches our attention right away. Opening it, we can see a “passwordbackup” field with a username and password in plain text without any encryption:
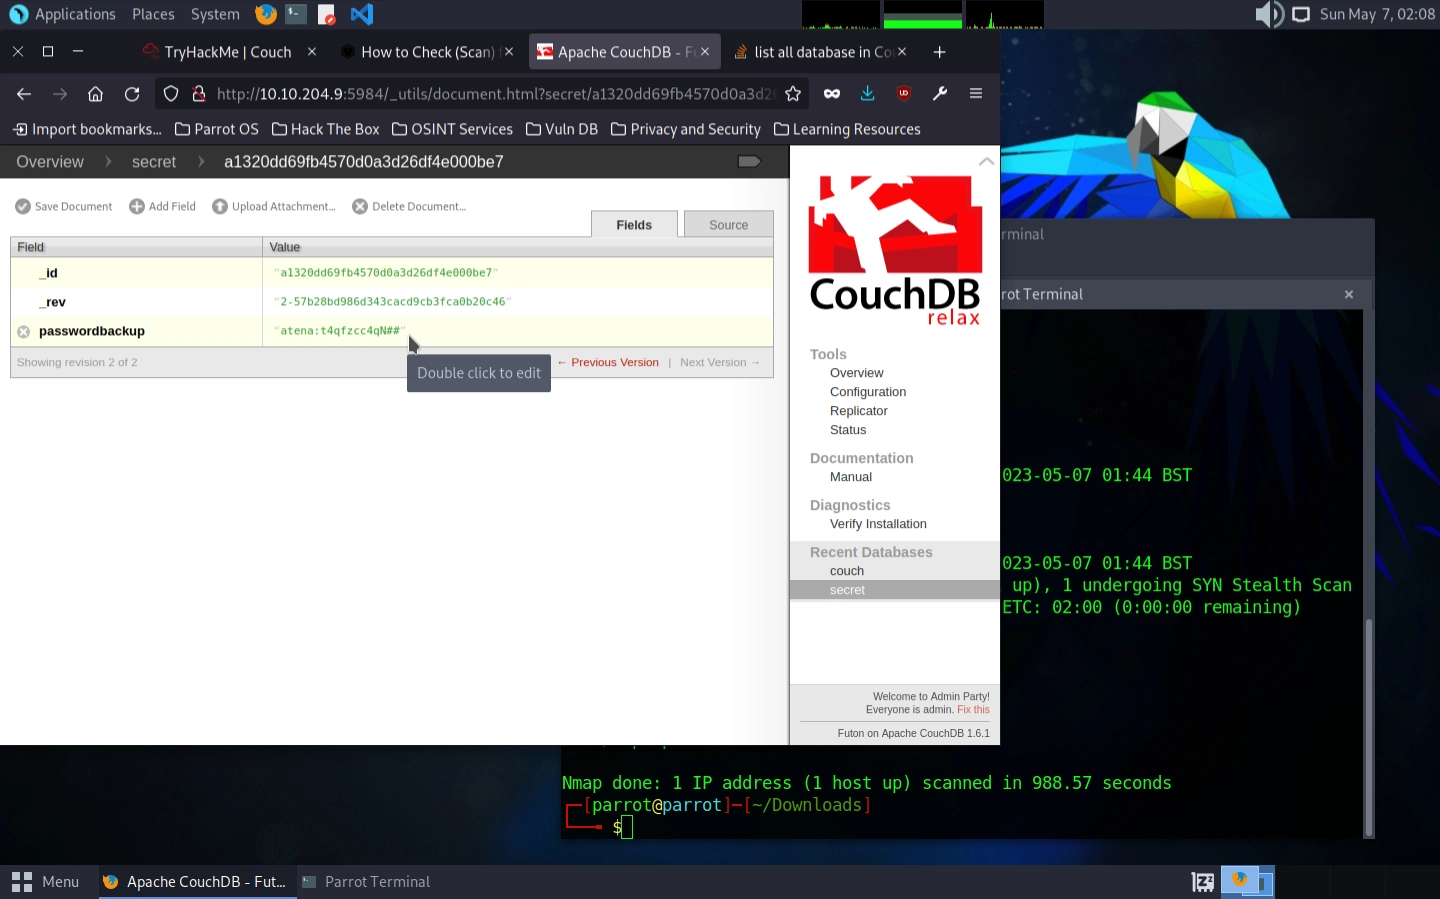
Storing passwords in plain text is one of the biggest security no-nos. Passwords should always be hashed (run through a one-way mathematical function) so that even if someone gets access to the database, they can’t see the actual passwords.
Compromising the machine
Our next mission is to find the key in a “user.txt” file on this machine. Using the information we’ve collected so far, we know we can probably access the machine via SSH and we also have a username and password combo.
Naturally, it’s up to us to try accessing SSH using these credentials. I’ve had to do this before but using keys, so I had to search for how to log in with username and password and came across this command:
ssh atena@10.10.204.9SSH (Secure Shell) is a protocol that allows secure remote access to computers. There are two main ways to authenticate with SSH: password-based (where you enter a password) and key-based (where you use cryptographic keys). Key-based authentication is more secure, but password-based is more common and easier to set up.
The password is requested right after and indeed, the username and password are correct. We got access to the machine. We hacked the mainframe. 😎

Now let’s find the “user.txt” file. We can start by using ls to list the files in the current directory and… it’s here. The file is already here. And we can get the key by printing the file contents with the cat user.txt command and voilà: THM{1ns3cure_couchdb} ✨
The ls command lists directory contents (like dir on Windows), and cat displays file contents. These are some of the most basic Linux commands, but they’re super useful for navigating and exploring systems.
Privilege escalation
This is where things get spicy. Or, in this case, where I cry and Leozinho laughs. We now need to escalate our privileges to find the final key (or flag) in the “root.txt” file.
Privilege escalation is the process of gaining higher-level permissions on a system than you initially have. In Linux systems, there are regular users (like “atena”) and the root user, which has complete control over the system. Many sensitive files and system functions are only accessible to root.
Starting from the principle that we’d need full access to the machine to access this file, I tried using sudo ls to see if there were any other files I couldn’t see before. I don’t even know if this makes a difference (probably not), but that’s when I discovered that this user doesn’t have permission to use sudo:
atena is not in the sudoers file. This incident will be reported.sudo (SuperUser DO) is a command that allows users to run commands as other users, typically as root. The “sudoers” file controls which users can use sudo and what commands they can run. The threatening message about reporting the incident is just a standard warning.
I tried to find out which users were in this “sudoers” file. I found several different commands on the internet, but they all showed me there weren’t any. So in theory, I’d have to get access to root, the supreme system user with access to everything. Writing this now seems kinda obvious, right? After all, we’re looking for the “root.txt” file.
I then searched for how to escalate privileges on Linux and found this article by Joseph Carson that explains in great detail how Linux permissions work and some techniques, exploits, and tools to automate this process. The content is very rich and explains everything very well from start to finish. I recommend reading it.
The first tool Joseph listed was LinEnum, a script that enumerates an extensive list of information and possible attack vectors on a machine. This article doesn’t detail how to use the script, so I found another post and basically, you just download the file to the victim machine, make the script executable, run it, and analyze the information.
LinEnum is an enumeration script that automatically gathers system information that might be useful for privilege escalation. It checks things like running processes, file permissions, installed software, network connections, and much more. It’s like having a checklist of potential vulnerabilities that you can review systematically.
So that’s what I did. I created a little folder to keep everything organized (after all, we’re hackers, not rude people), and then downloaded the script using wget:
mkdir linenum
cd linenum
wget https://raw.githubusercontent.com/rebootuser/LinEnum/master/LinEnum.sh
And that’s how I discovered the machine doesn’t have internet access. 😵💫 But that’s okay, I used this command on my machine instead and then sent it to the victim using scp:
scp LinEnum.sh atena@10.10.204.9:~/linenum/scp (Secure Copy) is a command that lets you securely transfer files between computers over SSH. It’s basically like copying files, but across a network connection.
Going back to the victim machine, I marked the script as executable and ran it:
chmod +x ./LinEnum.sh
./LinEnum.sh
The chmod +x command makes a file executable. In Linux, files need explicit execute permissions to be run as programs or scripts.
After a few minutes, I got an extensive list full of system information and possible vulnerabilities:

At this stage, I had to analyze all the information presented to me, which is pretty difficult when you’re not sure what you’re looking for. I tried to follow the post’s tips on how to analyze the information, but without much success. After a good while, Leozinho pointed out that what I needed was right in front of me, that is, right at the end of the LinEnum results.
And here comes the plot twist. The machine is running Docker.
Abusing Docker
What I thought would simply be accessing a database turned into escalating privileges by abusing Docker configurations. I googled these terms and found two very interesting resources: an article about this subject and in it a reference to GTFOBins, a list of programs that can be used to bypass misconfigured security restrictions, including Docker.
Docker is a containerization platform that allows applications to run in isolated environments called containers. Think of containers as lightweight virtual machines that share the host operating system’s kernel but have their own filesystem, network, and process space.
GTFOBins is an amazing resource that catalogs legitimate programs that can be abused to bypass security restrictions. It’s like a cheat sheet for privilege escalation and security bypasses.
In theory, if Docker is installed and the user has permission to use it, we can abuse Docker’s permissions to, among other things, create a container that has access to all local files on the victim machine.
This works because Docker containers can mount the host filesystem inside the container, and the Docker daemon typically runs with root privileges. So even if you’re a regular user, if you can run Docker commands, you can potentially access files that would normally be restricted.
So I tried running docker ps to list active containers and… we don’t have permission. 😐
The docker ps command lists currently running containers, similar to how ps lists running processes.
After burning through a few more brain cells, Leozinho repeated the hint he had given me earlier. And analyzing the LinEnum results once more, we can see the user’s command history and one of these commands is Docker-related.
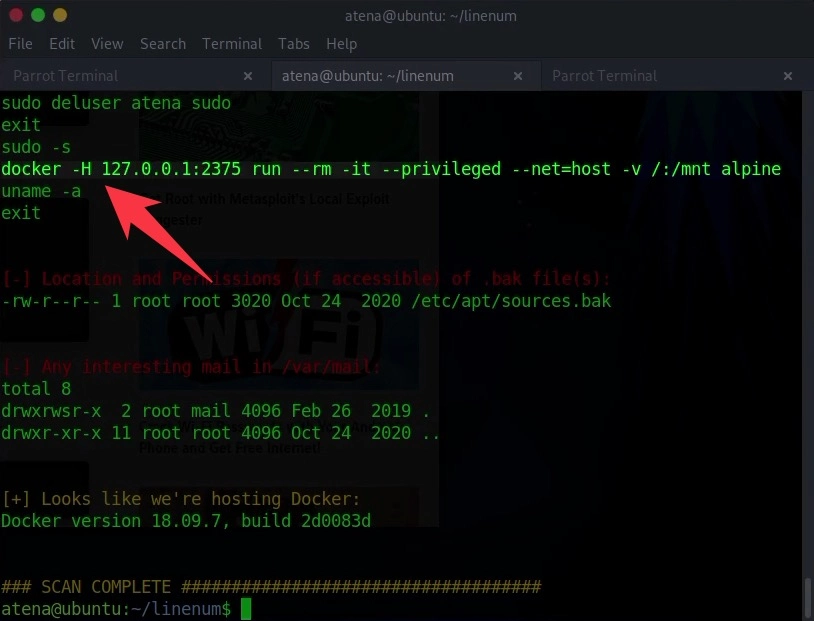
I won’t lie, I have no idea what this command is, but it’s very similar to what I saw in the resources I found and indeed can be used for the same purpose! Reading the command, we can see that it mounts local files in the /mnt directory of the container.
This command is creating a Docker container that mounts the entire root filesystem (/) of the host machine into the /mnt directory inside the container. Since the container runs with elevated privileges, this effectively gives us access to all files on the system, including those that would normally be restricted.
And precisely in /mnt we have another root directory with the root.txt file storing our so desired flag: THM{RCE_us1ng_Docker_API} 🥳🏁
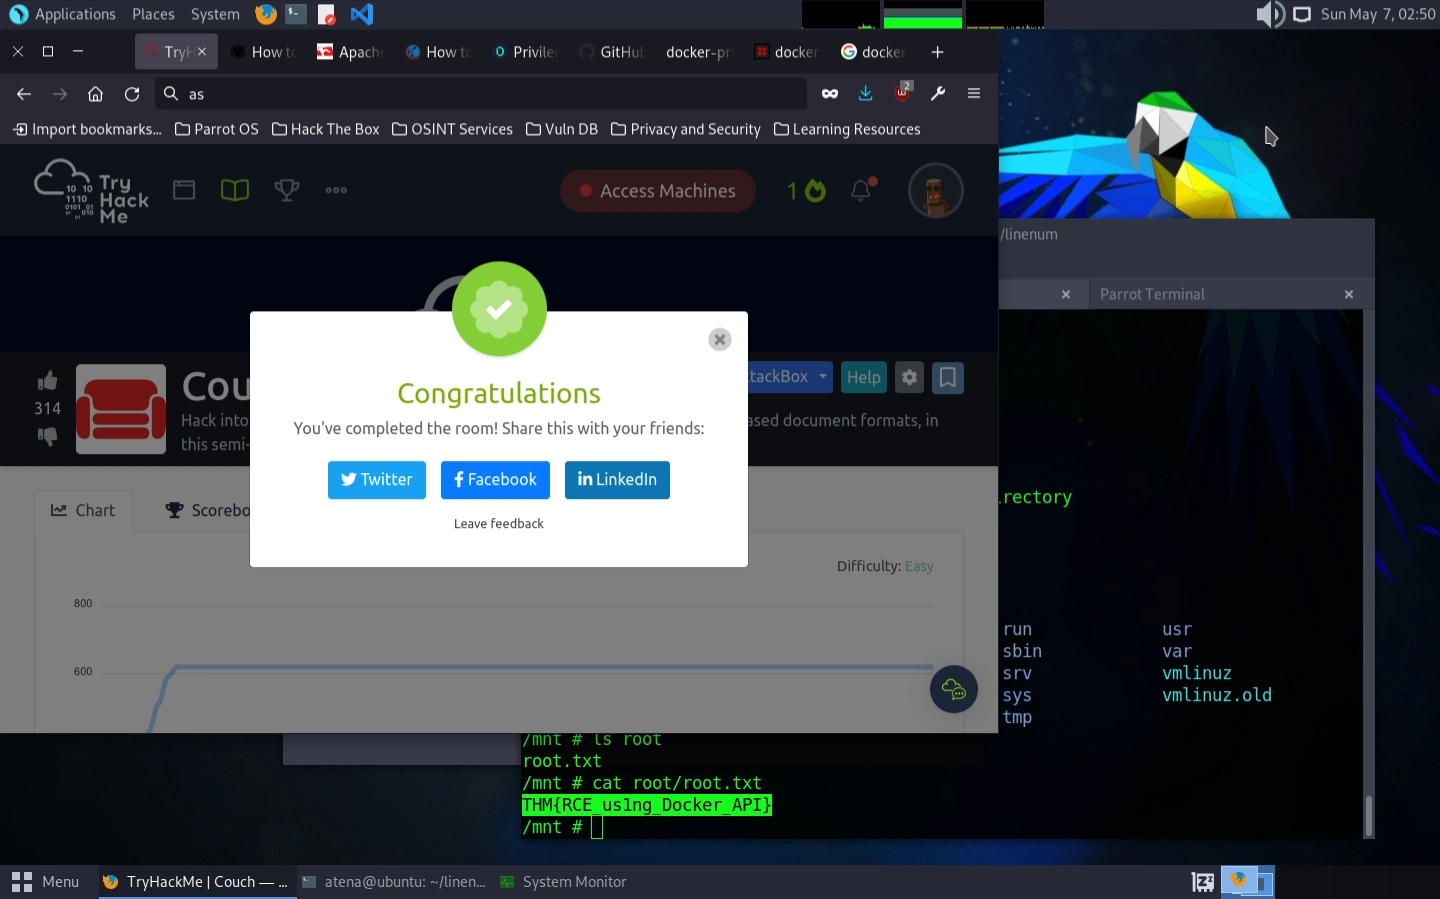
RCE stands for Remote Code Execution, which is what we achieved by exploiting the Docker configuration to run commands with elevated privileges.
Conclusion
It took me about an hour and a half to finish this challenge and I definitely learned a lot about Linux permissions and cybersecurity in general. It was exhausting, but I think it was worth it. Much of the process is understanding where TryHackMe’s questions want to lead you and catching the implicit hints they give you. I think that with time you develop a more clinical eye to better understand exactly what to search for and analyze.
The key lessons from this challenge were understanding how misconfigurations can lead to complete system compromise. We started with an unsecured CouchDB instance, used that to get initial access credentials, and then leveraged Docker misconfigurations to escalate to root privileges. Each step built on the previous one, showing how small security oversights can cascade into major breaches.
Thanks once again to Leozinho for the encouragement and support! I recommend to all people interested in the field to try participating in at least one CTF challenge. It’s certainly a very enriching experience that I won’t repeat anytime soon.